Graphic area
Graphic area with internal name Image, which we have already mentioned, is from the Additional entry and is one of the most important components. Component Image represents a rectangular area into which we can draw, write, we can save it on a drive or from a file read an image in it. In the Form we can have several components (Image1, Image2, Image3, etc.), but first we will learn to work with just one.
Each graphic area in the Lazarus has its canvas into which we draw (it is similar to canvas in paintings), we call it Canvas. On the Canvas we draw with a graphic pen tool - Pen, and we paint some surfaces with the brush tool - Brush, that have their own colours (Colour), and we can also set the pixel width tool - Width. On the Canvas we can also write texts that can be used to set the font type (Font).
After inserting the Image into the Form, we will see a
rectangle marked with black squares (much like when you paste a Button) to
adjust its size. To be able to accurately determine the position of some image
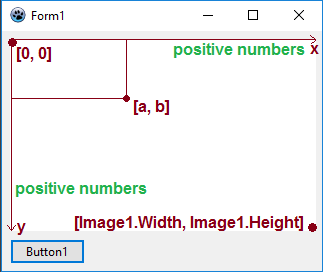
inside the Image, a co-ordinate is needed but it is a bit different in Windows
than we know it from Math. The upper left corner has the coordinates [0, 0] -
that is the beginning. Coordinate X directs from left to right to the top edge
of the area, and the Y coordinate from the top to the bottom on the left edge
of the area. (Sometimes negative coordinates are important, even though they
describe points outside the area.)
All graphic commands begin with two words that are linked by a dot - Image1.Canvas. After these two words, (after the dot again) we write a command to be executed on the screen image. Graphic commands are, for example, Rectangle (square, rectangle), Ellipse (ellipse, circle), TextOut (text), MoveTo (line break), LineTo (end of line).
We can now paste into the Form the component Image from the entryAdditional. While drawing, we will be using the action when pushing the button, i. e. in the Button1Click procedure we will write graphic commands between the words begin and end. We will use the TextOut command and write on the graphic screen text Hello (Figure 18).

Note the command entry:
- As we already
know, the command begins with the words Image 1 and Canvas (connected by a
dot), i. e. we draw on the canvas in the graphic area.
- After the dot follows a TextOut command that has 3 parameters; the first two are integer and indicate position of the text, the third parameter is the text itself bounded by apostrophes (keyboard shortcut ALT+39).
- Command parameters are given in circular brackets, separated by commas. After funning the program, the graphic area is not displayed (Figure 19), but when the button is pressed, it executes the action and we see the text (Figure 20).
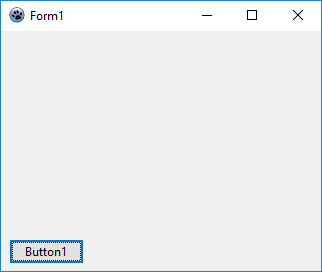
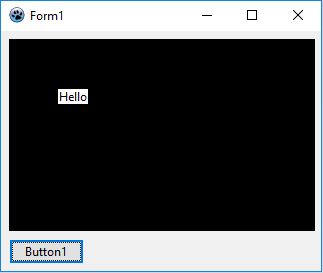
In the Lazarus, the graphic area is blacked out, but a white background will be better for us. That is why we will put another button in the Form, which will contain the action of whitening the graphic area. We will delete the graphic area even in the future, when we will create graphic projects in the Lazarus environment. We will assign the action to the Button2 button (Figure 21):

Erasing the graphic area will allow a simple FillRect command that will paint the entire area with a pre-set white colour (a tool Brush). We can assign this command either to a new button with which we will erase the graphic area or we can write it directly before the other commands in the Form (Figure 22):

If we want the graphic area to be white at the start of the program, we will use the initialization FormCreate procedure which starts automatically. We will create it by double-clicking on the Form surface (except for graphic area and buttons). Once created, we can write a graphic area erasure command (Figure 21 above).
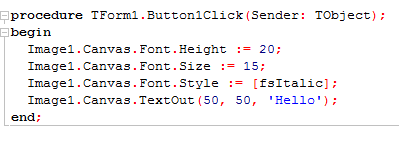
When working with a text (and graphic area at all) we can change the colour, size, style, etc. The basic text setting can be:
- font name - Font.Name
- font size - Font.Size
- font colour - Font.Color
- font height - Font.Height
- font style - Font.Style
The font style (Figure 23) is stated in square brackets (keyboard shortcut ALT+91, ALT+93) into which the font attributes are named: fsBold (bold), fsItalic (italic), fsUnderline (underlined), fsStrikeOut (strikethrough).
