Variable declaration
Declaration of a variable
- begins with the word var (variable), in the program between words procedure and begin.
- followed by identifiers separated by commas (e. g. a, b, c, etc.).
- followed by a colon.
- type of the variable at the end of the line.
In order for the system to know how much space in the operating memory it should allocate for the variable, it is important to know the type of the variable (or the data type). It also determines what kind of variable values can be stored in it (Figure 40). Lazarus, respectively Pascal, uses scalar and compound types of variables. Scalar types include Integer and real (Real) numbers, symbols (Char) and logical (Boolean) values. Composite types are for String, field (Array), File, Record and Set.

In the program between the begin and end lines we can already work with the variable/variables: we can insert some value in them (using the assignment command :=) and further use them in arithmetic expressions, where we list their name. The assignment command looks like as follows (Figure 41):
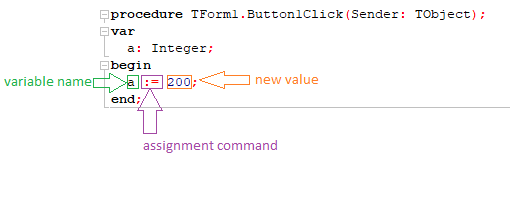
We add a new value to the variable. If there was any previously stored value in it, it overwrites and the program works with a new assigned value. However, the value may not be only one fixed number but may be given, for example, as an arithmetic expression that can also contain a variable. At first, this expression is tested (the computer counts its value) and the resulting value is then assigned. For example, if our variables are A, B, C, we can assign them such values:
A:=200;
B:=A + 50;
C:=A * B + 10;
Arithmetic expressions in programming are evaluated as in mathematics, i. e. multiplication (asterisk *), division (div or slash /) take precedence over the sum (plus +) or difference (minus -). If we want to evaluate a more complex expression, we will use round brackets as in mathematics. For better readability, we recommend to insert spaces between operators (+, -, *, /) and operands (variables and constants).
In arithmetic division expression, we use div, if it is an integer division with a remainder after a mod division (e. g. 10 div 3 = 3 and the remainder after division 10 mode 3 = 1). The variable is of the integer type. The slash sign (/) we use in decimal division (e. g. 15.6 / 3 = 5.2). The variable is of the real type.
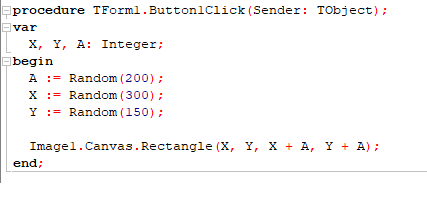
The first type of variable we will learn to use is Integer (int), so that we will work with whole numbers. Now that we already know how we declare variables and assign values to them, with their help we can draw, for example, random squares with random Xs and Ys coordinates. First, we declare three variables (using the var word): A - square page, X - X coordinate, Y - Y coordinate. Then we assign each of the variables a value. Lastly, we will write a Rectangle command with its input parameters (Figure 42).
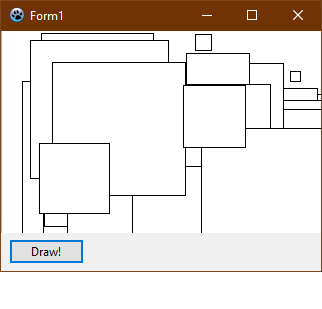
After running the program (F9) and a few clicks on the button, we see that in graphic area are drawn squares of different sizes with different positions (Figure 43).
Similarly, we can also draw ellipses, circles, or lines. Try instead squares to draw circles of the same size with different positions.
So far, Random has been used only to generate random points in a plane. Additionally, we can randomly generate colour, line thickness, frame lengths, random text size, and so on.
On the following example, we will show how we can randomly generate the colours of the brush, pen, and the line thickness (Figure 44). We will also use the special Randomize command that sets the random number generator to completely random value. We place this command at the beginning of the procedure.
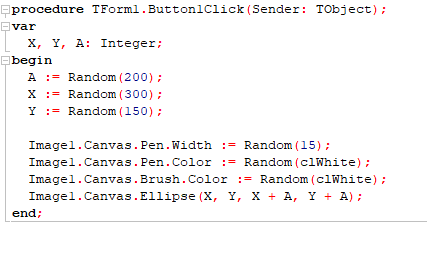
In the program, we used the Random(clWhite) command to generate random colour because clWhite has the largest colour code. We can assume that all colours are mixed from three basic colours (RGB model, i. e. Red, Green, Blue), and the resulting colour depends on how each of these three colours is represented. This representation is expressed by a number from 0 to 255. For "composing" individual colours, Lazarus uses the RGBToColor function, we enter three numbers from 0 to 255, and it "creates" the appropriate colour (let´s say, how would we work on art with a brush and mix new colours themselves). Let´s see, how are the most commonly used colours predefined:
clBlack = RGBToColor(0, 0, 0)
clWhite = RGBToColor(255, 255, 255)
clRed = RGBToColor(128, 0, 0)
clBlue = RGBToColor(0, 0, 255)
clGreen = RGBToColor(0, 128, 0)
If we want to generate a random colour with a numeric entry, the command would look like this:
Image1.Canvas.Brush.Color := Random(256 * 256 * 256);
and the command for a completely random colour might look like this:
Image1.Canvas.Brush.Color:=RGBToColor(Random(256),Random(256),Random(256));
or
Image1.Canvas.Brush.Color := Random(clWhite);
We have already used the commentary in the program, which is used for writing notes directly into the program. Where we want to write a comment, we will start at the beginning of the line with two slashes (//), the text written after these two slashes the program completely ignores. We can also "commented" any line or multiple lines of command. The comment can help us later in the program (e. g. after a long time when you do not remember exactly what the program/command should do).
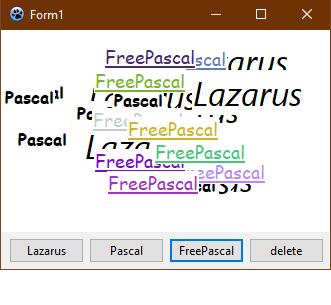
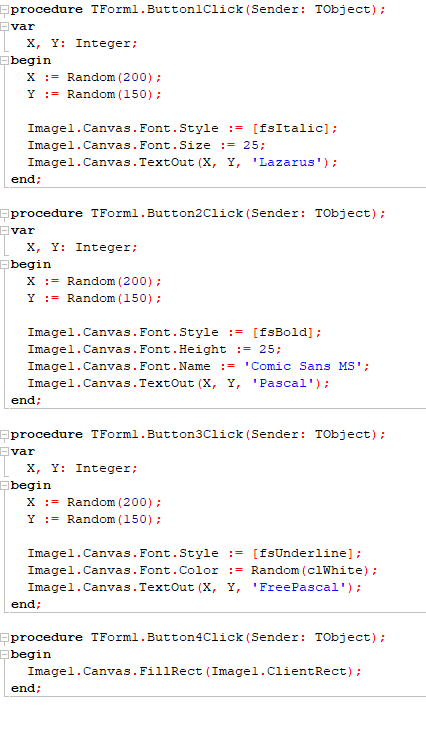
In the next example, we will practice work with text and Random function. By pressing the button, we will write a text to the graphical area, which will change its type, style, height, and font size setting and each text will be displayed when pressing the button (we will need several buttons). We will also include the erasing buttons in the form area and the closing button (Figure 45).
After running the program and pressing the buttons several times we will see this (Figure 46):
